Architects
BWC_Architects_Blog_Tilte-Graphic.png

Blog

Goings on at the BWC Architecture Studio

Custom design and fabrication - in the BWC workshop

We had a great open house last week - thanks to everyone who came out to help us warm the new shop space. It was great to see old and new faces milling about our workspace as we welcomed a beautiful Friday evening in our new location.

This week we’ve continue to be busy building in the workshop. We have several interior renovation design projects that have moved into the build phase, as well as a new fabrication job that just hit the shop floor.

This summer we are lined up for lots of custom fabrication, residential architecture, interior design and commercial renovation work being done in locations throughout the SF bay area (Oakland, Lafayette, San Francisco and Alameda).

Jillian Northrup
BWC June Open House - June 14th 2024

Very excited to have our first open house at the new workshop!

June 14th 2024, starts at 5PM and around 7 PM we’ll start wrapping up.

The new workshop is at 2998 Ford Street, Oakland CA 94601 in the lovely Jingletown Arts District.


We’ll have some fun projects to show and some demonstrations of our awesome CNC tools.

Would love to see you there!

Jeffrey McGrew
Pop-Color Acoustic Dampening Privacy Screens

As a latest addition to this fun funky SF office we renovated last year, these pop-color acoustic / sound dampening privacy screens now line the open office area. They provide much desired privacy for those seated along the hallway in this open office design.

We love to work with innovative and eco friendly materials. These privacy screens are made from a recycled PET, formed into a dense but light weight felt board. The boards soft physical properties create an acoustic dampening effect, helping mitigate the noise travel in the open space. The dense but soft material can also act as a pinboard & the light weight allows them to be easily moved around.

Since we wanted these screens to fit exactly to the desks, we made them to suite at our in house fabrication shop. The legs are cut from a thick aluminum and then bent to shape. Since we were making these custom, we added a cute little foot to the end profile.

Our pop-color felt panels are framed with the black stands, creating an interchangeable collection of desk screens that can easily be moved around the office by the client. With the durable frame and thick felt panel combination, we think they’ll enjoy their new acoustic dampening screens for a long time!

Jillian Northrup
This month at the studio!

Secret gallery exhibits, Oakland city building department meetings, felt screens, production shop layout, concrete tile installation, 3D printed scaled models, fancy FINE sign making & giant cabinets.

It has been a minute since we’ve posted what we’re up to, so here is a quick collage of things we’ve done so far this month while we work on some more detailed posts!

We’re busy in the shop and at the design table. This summer is shaping up to be productive and filled with producing some very cool projects. Of course we’ll post them all here as they progress…

Showcasing our Design Build Project Management Services - San Francisco and Beyond

We’ve been working on several great projects already this year! And through them all we’ve not only been both the architects and interior designers, we’ve also been the construction project managers. Our Design-Build Project Management Services are an added benefit to going with a full service Design-Build Architecture firm like ours.

Not only do we realize your commercial or residential renovation project, we will also stay with you every step of the way through project completion.

No matter what phase of your project you are in, we can assist with getting you from concepts to completion. We work with trusted General Contractors and licensed professionals that do the job right. And we represent you and your needs along the way, assuring that the project comes out as you expected and within the agreed budget and timelines.

From working with the city for permit expediting to adding those beautiful finishing touches to your space, we are experienced in handling it all to make the project come out great.

Our in house fabrication shop allows us to design and make custom elements for our projects, which creates spaces like no other, that are truly uniquely yours. We’d love to talk to you about your upcoming project!

Jillian Northrup
Residential Entryway Remodel

With focus on an entryway renovation, our design for this home remodel is complete, and we have begun construction. Taking out the original doorway and expanding the interior space, we are capturing some underused outside area to become the new foyer, which adds a coat closet, seating bench for taking off shoes, and a new sun filled entry room.

In the process, of doing the renovation to add this entryway, we’re adding some upgrades to the interior entry hallway, hall bathroom and laundry room. (We’ll share more on that later as the space is built….!)

Oak slat walls fill our design in the front entry room and in the hallway. Complete with “secret” hidden door covering the bathroom doorway. These slat walls not only add visual beauty and warmth to the space, but help with sound travel by dampening noise in an otherwise hard surface area. New concrete collaborative flooring goes in the foyer and extends outside for a dramatically defined entryway.

The slats will be visible through the font door windows and will envelope the front entry room. The new entryway statement piece will be warm and inviting. As this piece comes together we’ll be posting more.

Meanwhile at our production shop in Oakland, we are underway fabricating the slat walls, bench, cabinet, ceiling and secret door for installation.

As part of our residential and commercial renovation business, we produce custom architectural and interior pieces for just about all our projects;. This is what makes every space we do unique and bespoke to our design studio.

We’re excited to be posting more on this space as it progresses!

Acoustic Felt Curtain and Acoustic Reading Nook Design

Many of our clients in the SF bay area are business owners who are leasing a space and looking to renovate. The challenge to keep the project on budget and to make a space that truly fits their practical needs and aesthetic desires is where we specialize. We work with many clients who lease or own their building, and do not want to put in the upfront cost of permanent walls in their renovation quite yet. These design constraints allow us to flex our interior design mussels, creating spaces with large custom furniture, rolling partitions, screens and other non permanent elements that do the job of creating the desired space transitions.

To separate spaces in a fun eye popping way, we designed this acoustic felt screen as an easily configurable room divider. This low and long header between the spaces allowed us to easily fit the acoustic panels on a track creating a very easy to move, sound dampening curtain. We cut fun shapes into the acoustic felt, giving it interest and allowing some light to come through, while still dampening the sound of traveling noise.

Addressing the need for acoustic dampening of traveling voices in this open floorplan of a school, we specified carpeting, fun acoustic felt walls and these custom designed reading nooks below for the kids lounge area.

These custom reading nooks we designed for the school create a quite and personal space for the students when looking for private reading or rest time. The “reading nooks” were placed in a corner of the building, defining that area in a cost efficient manner - allowing the school not to upfront the cost of putting up walls in a building they are leasing.

You can see the full project scope as well as all the interesting pieces we did for this space on our full project post here.

Having our own in house fabrication shop (Secret Weapon Workshop) also allows us to keep the prices down for custom elements like this and make quick changes or updates as needed while staying in the agreed budget.

Jillian Northrup
Climbing Wall bookcase for a small school

As part of a larger project - a building renovation for a small charter school - we designed this fun climbing wall play area for the front entry of the school. Moving into a building with an open floor plan, the school needed to break up and define the areas. The climbing wall acts as this defining feature as you come through the entry. It is designed as a kids play and relaxing area, filled with sunlight, bright colors, beanbags and the climbing wall. But it also acts as a relaxing ‘wow’ feature for the parents and visitors first entering the space.

The climbing wall is a fun & very functional piece, securely attached to the floor and wall. On one side it is a climbing wall created to serve multiple ages from age 5 to 12. On the back side of the climbing wall, the unit is a large storage bookshelf. Overall it defines the area, separating the front play area from the rest of the class work areas, and creating a defined area for the indoor play.

A playful tunnel connects the spaces along the wall, while also creating a more challenging climbing feature for the older students.

We created the climbing wall design to be strong, affordable and easy to install. The unit came into the space in sections and bolted together and to the floor for secure connections. A few people moving these units into the space was all that was needed to set this up, bolt it all in place and attach the hand holds.

An eye catching, interactive and pleasing construction, this cool climbing wall for the school is fun as it is functional.

Jillian Northrup
Autodesk Design & Make Awards 2023

This year we were given the honor of being the designers and makers of this prestigious yearly award: the Autodesk Design & Make Awards 2023, presented at the annual conference, Autodesk University.

This award, formerly known as the Autodesk Excellence Awards is given to “celebrate the people, projects and technologies behind exceptional contributions to architecture, engineering & construction; product design & manufacturing; media & entertainment; and education.” We were excited for the challenge of the design and fabrication, and are proud of how it came out. These were awarded to the participants in mid November, 2023 at Autodesk University

With the award description in mind, we knew it needed to incorporate multiple materials, married together beautifully using digital manufacturing techniques. Luckily this is what we do!

We also knew from conversations with the client, that this award needed to be functional. The desire was to have something that not only acts to recognizes the outstanding people and projects in the industry, but also gives those people a physical award that has function and delight.

With this charge we went through many design options of all shapes and scales and functions. We eventually landed on the “plinth” style that eneded up as the final design direction. We explored that plinth style through multiple iterations.

The prototyping phase involved creating with physical samples, refining the final size, functionality options and aesthetic.

Next came the material selections. We hand picked the wood for the plinth, choosing a local salvaged walnut. For the chassis we chose aluminum, for its infinite recyclability and easy machinability. For the logo top we chose a 3D printed SLA technique that we had sandblasted and then added integrated led light strips. Incorporating three kinds of manufacturing techniques for interest and to nod a bit to the industries represented for this award. Secret Weapon Workshop in Oakland did the majority of the CNC work, fabrication & assembly.

The final design with its integrated Qi charger, LED light on the soft, sandblasted 3D print, hardwood plinth with drawer and aluminum chassis with with carved names and logo - hits all the marks for this design through functionality, delight and design.

Jillian Northrup
Office Refresh for The Longnow

We’re a little over 9 years since we finished construction of the renowned bar in San Francisco, The Interval at The Longnow; a project we are very proud of. The interior layout has functioned so well over these last years that, even as we approach this 10 year mark, the layout serves the use so well that it has been named the best bar in countless articles since its opening.

Above The Interval bar is a lesser known and talked about space: an office for the staff of The Longnow. Behind a secret bookcase door at the top of the stairs, this is a place where the great minds behind the organization do their daily work. A space we designed and built along with the downstairs bar almost 10 years ago, though unlike the bar, was in dire need of rethinking as we all know how much workspace dynamics have changed over these last few years.

We were asked by The Longnow to help revitalize this space. Rethinking the layout with an updated mind of the way the staff works today. We helped them realize a workspace that is more of a meeting and gathering space, with a layout that is designed around how the staff is using the space now.

New Floorplan for a new way of working

Gone are the days of rows of desks. Now we have group meeting tables, comfortable seating areas and casual meeting areas. A more thoughtful floorplan for how we are working and meeting today.

We’ve taken out the rows of desks from pre pandemic area and created a layout that invites people to come, stay, gather. Within this small office envelope we’ve created 6 distinct seating areas for different functions.

Group seating / meeting areas for collaborative working, group working and meetings. Solo seating areas, desk spaces and a casual meeting area. This small and efficiently laid out space even has a small kitchenette, sound proof telephone room and office storage cabinets.

As part of our business practice, we have a fabrication shop that makes custom elements for our projects. Adding the live edge walnut table and countertop from salvaged hardwood slabs created anchor point for this small office space, and was also a relevant thinking point for the space, as it can reference projects the organization is working on. We processed, treated and fabricated the final pieces of the hardwood slabs in our shop in Oakland CA to make these one of a kind pieces.

This is one of the distinctions of our firm, that we do these elements in house, so we can thoughtfully integrated them into our overall design of the space.

The table and matching live edge countertop create both the desired focal point and practical surface that was needed for this small office to be the effective meeting and working environment it needs to be. You can see the whole project write up page here. And our original Interval at The Long Now project page here.

Jillian Northrup
Acoustical Lighting

Most offices these days have an open office floor plan, which is why we are often asked by our clients to redesign their space and address the open office acoustical challenges.

There are many products on the market designed to help with acoustics. But the main challenge we found was finding ones that were both interesting, unique and relatively affordable. These products use soft materials, like felt, placed in many angles to help absorb the sound waves. These sound absorbing products, while affective, are often not very aesthetically interesting and the options are limited. So of course we decided we needed to design and make some ourselves - some fun custom designed acoustic light fixtures and acoustical pendants to help mitigate the traveling noise from lobbies and open floor plan areas.

These fixtures were designed with a particular company office in mind, using their brand colors and style. A large collection of fixtures creates a dense visual affect for the office renovation; defining the space while softening the noise travel issues with the open lobby and work areas.

Nodding to the brand colors and style of the company these were designed for, the two tone felt pendants cover the ceiling of the lobby, creating both a dramatic visual appearance and a functional acoustic dampening.

While working on the entire office renovation for this SF office space, we designed a few different acoustic pendant styles to sprinkle throughout. These will help to reduce echo and noise travel in the particularly noisy areas like the café lunch room, open office area and lobby.

The larger style of our acoustic lighting are made with a thick, rigid, recycled polyester felt board, that we are able to cut into complex profile shapes. These two and three feet wide fixtures cover a lot of ceiling area and are thus able to positively impact the sound quality of a room.

To infill the smaller spaces and add some lighting diversity and interest, we designed and fabricated a smaller felt fixture as well, using a thinner more flexible material in a layers with a slumping affect.

The final affect is a sea of fixtures, creating a rich texture and aesthetic affect - with the added acoustic benefit.

Hacking the Building Code: Part Seven - Permits, Inspections, and Inspectors

In the wake of the tragic Ghostship fire in Oakland, I got more involved with our local planning and building departments, as well as some local artist spaces and maker associations who were looking for advice. I also have taken many complex and unusual projects from concept to finished construction in many different cities. From this experience, I’ve realized that a guide to interacting with building officials and codes for people looking to do creative things with space was sorely needed. This series of blog posts hopes to be that guide. I’ll be posting these over the next few months with the intent to make a comprehensive guide.

The prior posts in the series are available here:

Hacking the Building Code: Part one - What are building codes and where do I find them?

Hacking the Building Code: Part Two - Building Officials and how to approach them.

Hacking the Building Code: Part Three - Use is the Key Factor

Hacking the Building Code: Part Four - Zoning & Occupancy

Hacking the Building Code: Part Five - Occupant Loads and Construction Type

Hacking the Building Code: Part Six - Applications, Plans, and Variances

Disclaimer

This series is purely for informational and educational purposes and does not constitute professional or legal advice. While this information is provided by Because We Can, and while we endeavor to keep this information up to date and correct, we make no representations or warranties of any kind, express or implied, as to the accuracy or completeness of this information. We do not provide any guarantees or warrant and do not accept any liability on your actions from this information. Any reliance you place on such information is therefore strictly at your own risk, and we highly recommend you hire a building professional (like us) to review your specific case.

Permits, Inspections, and Inspectors

In this final part of our guide, we’ll be getting into permits, inspections, and working with inspectors while the construction is happening.

Permits

As we talked about in an earlier part, the ‘building permit’ is actually more complex than a single thing. It’s better to think of it as a collection of various agreements, approvals, and documents. Once the “building permit” is issued what actually happens is either the building owner, or a contractor working for that owner, pays for the permit and receives an official set of plans from the building authorities, along with a job card and usually some other paperwork concerning the project, worker’s rights, labor issues, etc. All of this needs to be kept together, for this ‘building package’ is really what the ‘building permit’ is, and it’s what the inspectors will need to reference and make notes on as the project proceeds.

As the project progresses, and construction is completed, specific items on the Job Card get signed off as they are inspected. There is usually a time window as well that construction has to start within one year of the permit being issued, and if you go for longer than a year without an inspection the permit expires, although in some cases you can file for extensions if needed.

Once everything is done, you’ll have final inspections from the various officials, and any last items completed. Once the project is fully complete you’ll get an official notice of such, for a new building that might be a Certificate of Occupancy that lets you move into the building, for a remodeled cafe it could be approval from the Health Department, etc.

These permits and drawings also become public record, and in many cases can be freely reviewed at your local building department or even online. This can be helpful in proving what work was done prior, and when it was done to see how out of compliance with current code it may be.

Inspections & Inspectors

As we’ve said in earlier sections, the construction industry is a ‘low trust environment’. To ensure that things were built both to what the approved plans show and to code, various inspectors are used to check the work. Usually there are things that have to be inspected prior to the next step happening, for that next step will cover up the earlier work. Such as rebar needing to be inspected for proper size, spacing, tie-offs, etc. before you pour the concrete that will encase it.

While you may be familiar with ‘Building Inspectors’ who work for the City and/or County, there’s other sorts of inspectors as well. Some more complex structural elements may require what’s called a ‘special inspector’, a neutral third party engineer that’s hired to review the work independently and confirm it was done correctly. There can be specific inspectors that just review part of the project, such as inspectors that work for the local utility company, special lab tests for concrete or weld strength, health inspectors for restaurants, or the Fire Marshall. There are even private inspectors on larger, more complex projects that are hired by the owner to review the work and approve it prior to the contractors getting fully paid for that portion of the work (sometimes called ‘funds control’).

All of these inspectors will typically ‘sign off’ on the ‘job card’ when they approve something or will produce a report that will be included in the project’s records. Like we talked about in the last part, the building permit usually takes the form of something called the Job Card, a sort of special checklist that’s kept on the construction site along with the set of plans. As work is completed, inspections are scheduled, and the inspectors will sign their part of that checklist if the work is approved. Sometimes they will make notes on the Job Card as well, stating that they are conditionally approving something (as in ‘they have to fix this one minor thing, and once they do, then this part will be 100% done).

Scheduling inspections can be a tricky thing, most inspectors can only be contacted early in the morning on specific days they are available, and their schedules fill up very quickly. It’s best to call the very moment they are available, but typically if you do you can get them scheduled to come out within a few days, maybe a week. An experienced contractor will be a huge help here, for they will know how long it typically takes to get an inspector onsite, and might even have a relationship with the inspectors from prior projects, so you can call ahead of the work being 100% complete so as to not have to wait too long between when the work is completed and inspected. This becomes really important when you’ve got parts of the work that are dependent on other parts, such as the earlier example with rebar and concrete.

Like with most building officials, if you are friendly, competent, and not trying to get away with anything or acting in bad faith, they will work with you to help get the project done. If you’re a jerk, they will be, and if you’re not doing things somewhat right they might make you tear out and redo work, or open up work so they can see inside. And if you’re trying to get away with something, or acting in bad faith, then you’re just making their lives miserable, and so they will do the same to you most likely.

So when you have the inspector come out, have things be clear, well organized, cleaned up, and ready for them. Don’t waste their time, and be open and honest, and you’ll find them soon helpful and easier to work with. Honestly, the biggest problem you may run into (if you don’t cause them yourself by not doing the above) is when the inspector disagrees with how the approved plans show something getting done, or disagree with how your contractors or subcontractors want to do something and want it done another way. When this happens, you can go to the city and try to fight if you really want to, but we’ve found most of the time to have been able to find a common ground with the inspector to get the project done.

Also again the inspector is looking at two things; the first is if the work is to code, and the second is if the work matches what the approved plans show as happening. So if you’ve made big design changes, get those into your plans, and get them re-submitted ASAP so that the inspector is looking at both the work and the drawings and having them match.

Conclusion

As we wrap up this guide to the building code, we’re just humbled and honored at the response we’ve been getting online so far. It’s been incredible! And we hope that this series has been helpful and informative. If you have any questions or corrections please reach out, I’m more than happy to talk further about all of this.

I’d like to thank all of our wonderful clients and employees that make BWC possible, and our various shop cats for the photos I used in this series.

And if you need help with your project, we’d love to hear from you. We love helping people turn their buildings into productive and wonderful spaces to be in!

Jeffrey McGrew
Forgotten Fridays - Oakland Office Interior Design

Through all design processes, whether it be interior design, architectural design, furniture design or any other; in most projects there are ideas that, no matter how much everyone likes them or not, need to be cut, never to be realized.

Our 'Forgotten Fridays' series is a place for us to showcase and celebrate the most interesting “forgotten” designs; parts of which may someday again breath life!

Our firm works in a very organic design process, building and iterating quickly. Many of the early designs that are thrown away on one project realize themselves in other forms & in other projects. Here is one from an office redesign in Downtown Oakland from several years back. We were given a challenging interior commercial space that was never intended to be an office space. It was at one time used as a server farm, and thus had no windows and was huge! It was a bit cave like and not a very human hospitable space.

We were brought in to tackle this interior design project: to create a space that felt warm and filled with life, even though it was starting out as a cave of a commercial space.

By placing large trees around the space in communal meeting areas, we were able to give the flow of the office some focal points and green foliage in the peripheral of all the views, no matter where employees were sitting.

Green plush turf used for carpeting gave an outside feel and texture change across the large scape of seating. And cool articulated triangular paneling to create screens, lighting shades and seating, gave a warm tone and points of interest to a once barren concrete cave.

One of our favorite ideas was a privacy seating idea using an off the shelf ball chair. Needing to create private areas for calls and meetings without erecting walls in the space, we designed these fun acoustic privacy shields that swivel around an existing ball chair. Who doesn’t want to sit in a ball chair for their private meeting - now with acoustic privacy shield!

These fun ideas were left on the cutting room floor at the time, but have resurrected themselves in many ways & iterations over the years. Who knows when they’ll pop up again. Happy Friday.

Jillian Northrup
Off The Grid - Deployable Event Tables

We were able to see the Deployable Event Tables we made for Off the Grid this last Friday! Getting tons of use by happy event goers - they were very popular and always full capacity!

Earlier this year we were contacted by the Off the Grid team to design and build 10 of these deployable event tables. If you are lucky enough to live in the San Francisco Bay Area, you have probably been to an Off the Grid event. Designed for heavy public use every weekend, these deployable, rolling picnic table seating units are beautiful as well as functional. We designed them as individual units to easily seat 4 adults with nice high backs, leg room and a transparent windscreen.

The client needed a design that allowed loading and unloading these for each event, so easy stacking, nesting and maneuverability were key in the design. Two people can assemble a unit, which breaks down into four big chunks with large and easy to handle bolt connections; making it quick work for the team.

Check out our full project page on these custom event table & the project here!

Jillian Northrup
Current Mood (Boards)

Over these last several weeks we've been busy, heads down, working on several new projects. We’re in different phases of the design and inspiration stage on all of them. Several are starting to arrive at the really exciting project phase where the designs and layouts are coming together and we’ll be finalizing the ideas shortly.

These new architectural and design projects we’re focused right now range from one large building interior, two residential renovations, one commercial exterior renovation and one bespoke "Objet d'intérêt"...


Bouncing between the projects’ conceptual design iterations and our final interior design layout and custom fabricated elements, it is fun to see the diversity in images from the different projects mood boards.

Clearly these are from several different kinds of spaces, but all of them are moving in wonderfully inspiring directions.
This fun collage does a pretty good job showing the diversity of our projects....

Jillian Northrup
PBS Newshour at The Interval

A recent PBS Newshour with Jeffry Brown interviewed Jenny Odell at The Interval! Great shots of our Parklets outside and the interview takes place inside the Interval!

You can see more interior images of the interval here on our projects page

Fun to see the space on camera, and the topic is ... of course... on theme....

https://www.pbs.org/newshour/show/jenny-odells-new-book-saving-time-gives-fresh-perspective-on-the-meaning-of-time

Jillian Northrup
Hacking the Building Code: Part Six - Applications, Plans, and Variances 

In the wake of the tragic Ghostship fire in Oakland, I got more involved with our local planning and building departments, as well as some local artist spaces and maker associations who were looking for advice. I also have taken many complex and unusual projects from concept to finished construction in many different cities. From this experience, I’ve realized that a guide to interacting with building officials and codes for people looking to do creative things with space was sorely needed. This series of blog posts hopes to be that guide. I’ll be posting these over the next few months with the intent to make a comprehensive guide.

The prior posts in the series are available here:

Hacking the Building Code: Part one - What are building codes and where do I find them?

Hacking the Building Code: Part Two - Building Officials and how to approach them.

Hacking the Building Code: Part Three - Use is the Key Factor

Hacking the Building Code: Part Four - Zoning & Occupancy

Hacking the Building Code: Part Five - Occupant Loads and Construction Type

Disclaimer

This series is purely for informational and educational purposes and does not constitute professional or legal advice. While this information is provided by Because We Can, and while we endeavor to keep this information up to date and correct, we make no representations or warranties of any kind, express or implied, as to the accuracy or completeness of this information. We do not provide any guarantees or warrant and do not accept any liability on your actions from this information. Any reliance you place on such information is therefore strictly at your own risk, and we highly recommend you hire a building professional (like us) to review your specific case.

Applications, Plans, and Variances 

Oh my! In this section we’ll dig into all the different sorts of applications, documents, and paperwork you’ll typically need to submit to legally build a project.

Applications

Most things you’re going to build are going to need some sort of approval from a building official before you start. Usually this approval is formally asked for and granted with some sort of application of a specific form for the type of work you’re doing, which when approved grants you a permit for that work. These forms are filled out with the relevant project information, and usually involve submitting more information along with it, such as photos, plans, calculations, reports, and more.

A very simple project, such as minor electrical work, reroofing a house, putting in a new heating system to replace an old one, replacing cabinets in a kitchen, etc. might not need anything more than a written description of the work on the application form itself, and can even be approved over the counter. 

A more complex project, such as remodeling a warehouse into a condo complex, will require not only more information than just a written description, they will typically need multiple applications, documents, and approvals from many different City agencies that will need to spend time reviewing all the information extensively. These various applications are going to need specific and complete information about your project, organized in the way that City likes, in order for them to get approval. Ask questions, follow the directions exactly that are on the forms, and make sure to complete them fully.

Typically all of the approved applications are collectively called the ‘building permit’. Your project was reviewed by the different City building officials, usually starting with Planning, then Building, and then sometimes onto Fire and even local municipal utilities, and each department reviewed and formally approved things, with the final step being the City issuing you a building permit. For certain types of projects, there could even be a public review before the city officials review it at all, where the project will go before a planning board or a city counsel, and they and/or the general public be allowed to make comments on the project before it moves forward.

Usually the ‘building permit’ actually takes the form of a special sort of checklist you’ll keep onsite at the project, with the official set of all the plans, forms, and other documents along with it that the City officially approved. Various building inspectors will then write comments and sign off things on that special checklist (sometimes called a ‘job card’) as they are built, inspected, and approved.

There can also be different applications and approvals for different phases and even parts of a project. For example, you could just apply to the Planning department with a scheme of what ‘could be’ done, that once approved, becomes something called an ‘entitlement’ that adds value to the property. For now you’ve got legal ‘proof’ that the City would let you build that sort of a building on that site. So a legal pre-approval for a big house on an empty lot or tearing down a defunct commercial property to build an apartment building. This reduces risk to a developer, for now they don’t have to do that legwork, and already have planning approval in hand for when they go for the actual building permit to build the actual building, even if it’s not exactly the same as the building that was submitted for the entitlement.

There can be ‘sub-applications’ too, where you’ll need to file applications for various approvals within a specific department, such as when dealing with a historic building that might require additional review and approval from a specific person or team within the larger planning department. Or having to apply for operational permits from the health department before you can properly start using your new restaurant’s kitchen.

Once you do get the building permit, you might have to get additional approvals to put a construction dumpster out front of the building, file paperwork showing how you’re meeting City-required recycling goals, keep records on how you’re meeting OSHA requirements during construction, permits to temporarily close the parking out front to make room for the concrete truck on the day of the concrete pour, and more. 

And as the project is close to completion, you may want to apply for a ‘Temporary Certificate of Occupancy’ or ‘TCO’ that would let you start to move in and use the building, even though it’s still technically ‘under construction’ as the contractors are wrapping things up. And once the project is complete, you’ll need to ‘close out’ the permit by ensuring everything on that checklist has been signed off that needs it and that the official Certificate of Occupancy has been updated and more.

The thing is the approved applications, and the various drawings and documents within, usually become legal documents that go on file within the City. They impact the property values and insurance terms for the building, become the legal basis for what you can use a building for, would become really important in any lawsuit about the building, and more. So being well-organized, keeping good notes and records, and making copies of everything will go a long way here. 

It’s a lot of leg work and a lot of paperwork, and one of the areas that hiring someone experienced in the specific process for the kind of project you’re doing can be a huge help. There is a reason that people can make whole careers out of just helping get complex projects through a larger city’s various departments! But thankfully if you can’t afford to hire skilled help in this area I’ve found that if you’re friendly, nice, respectful, and ask lots of questions the different building officials will help point you in the right directions of what applications and approvals you’ll need to make for your project. Even us professionals in this space have to do this to properly navigate these waters!

Plans (& Specifications, calcs, reports, photos…)

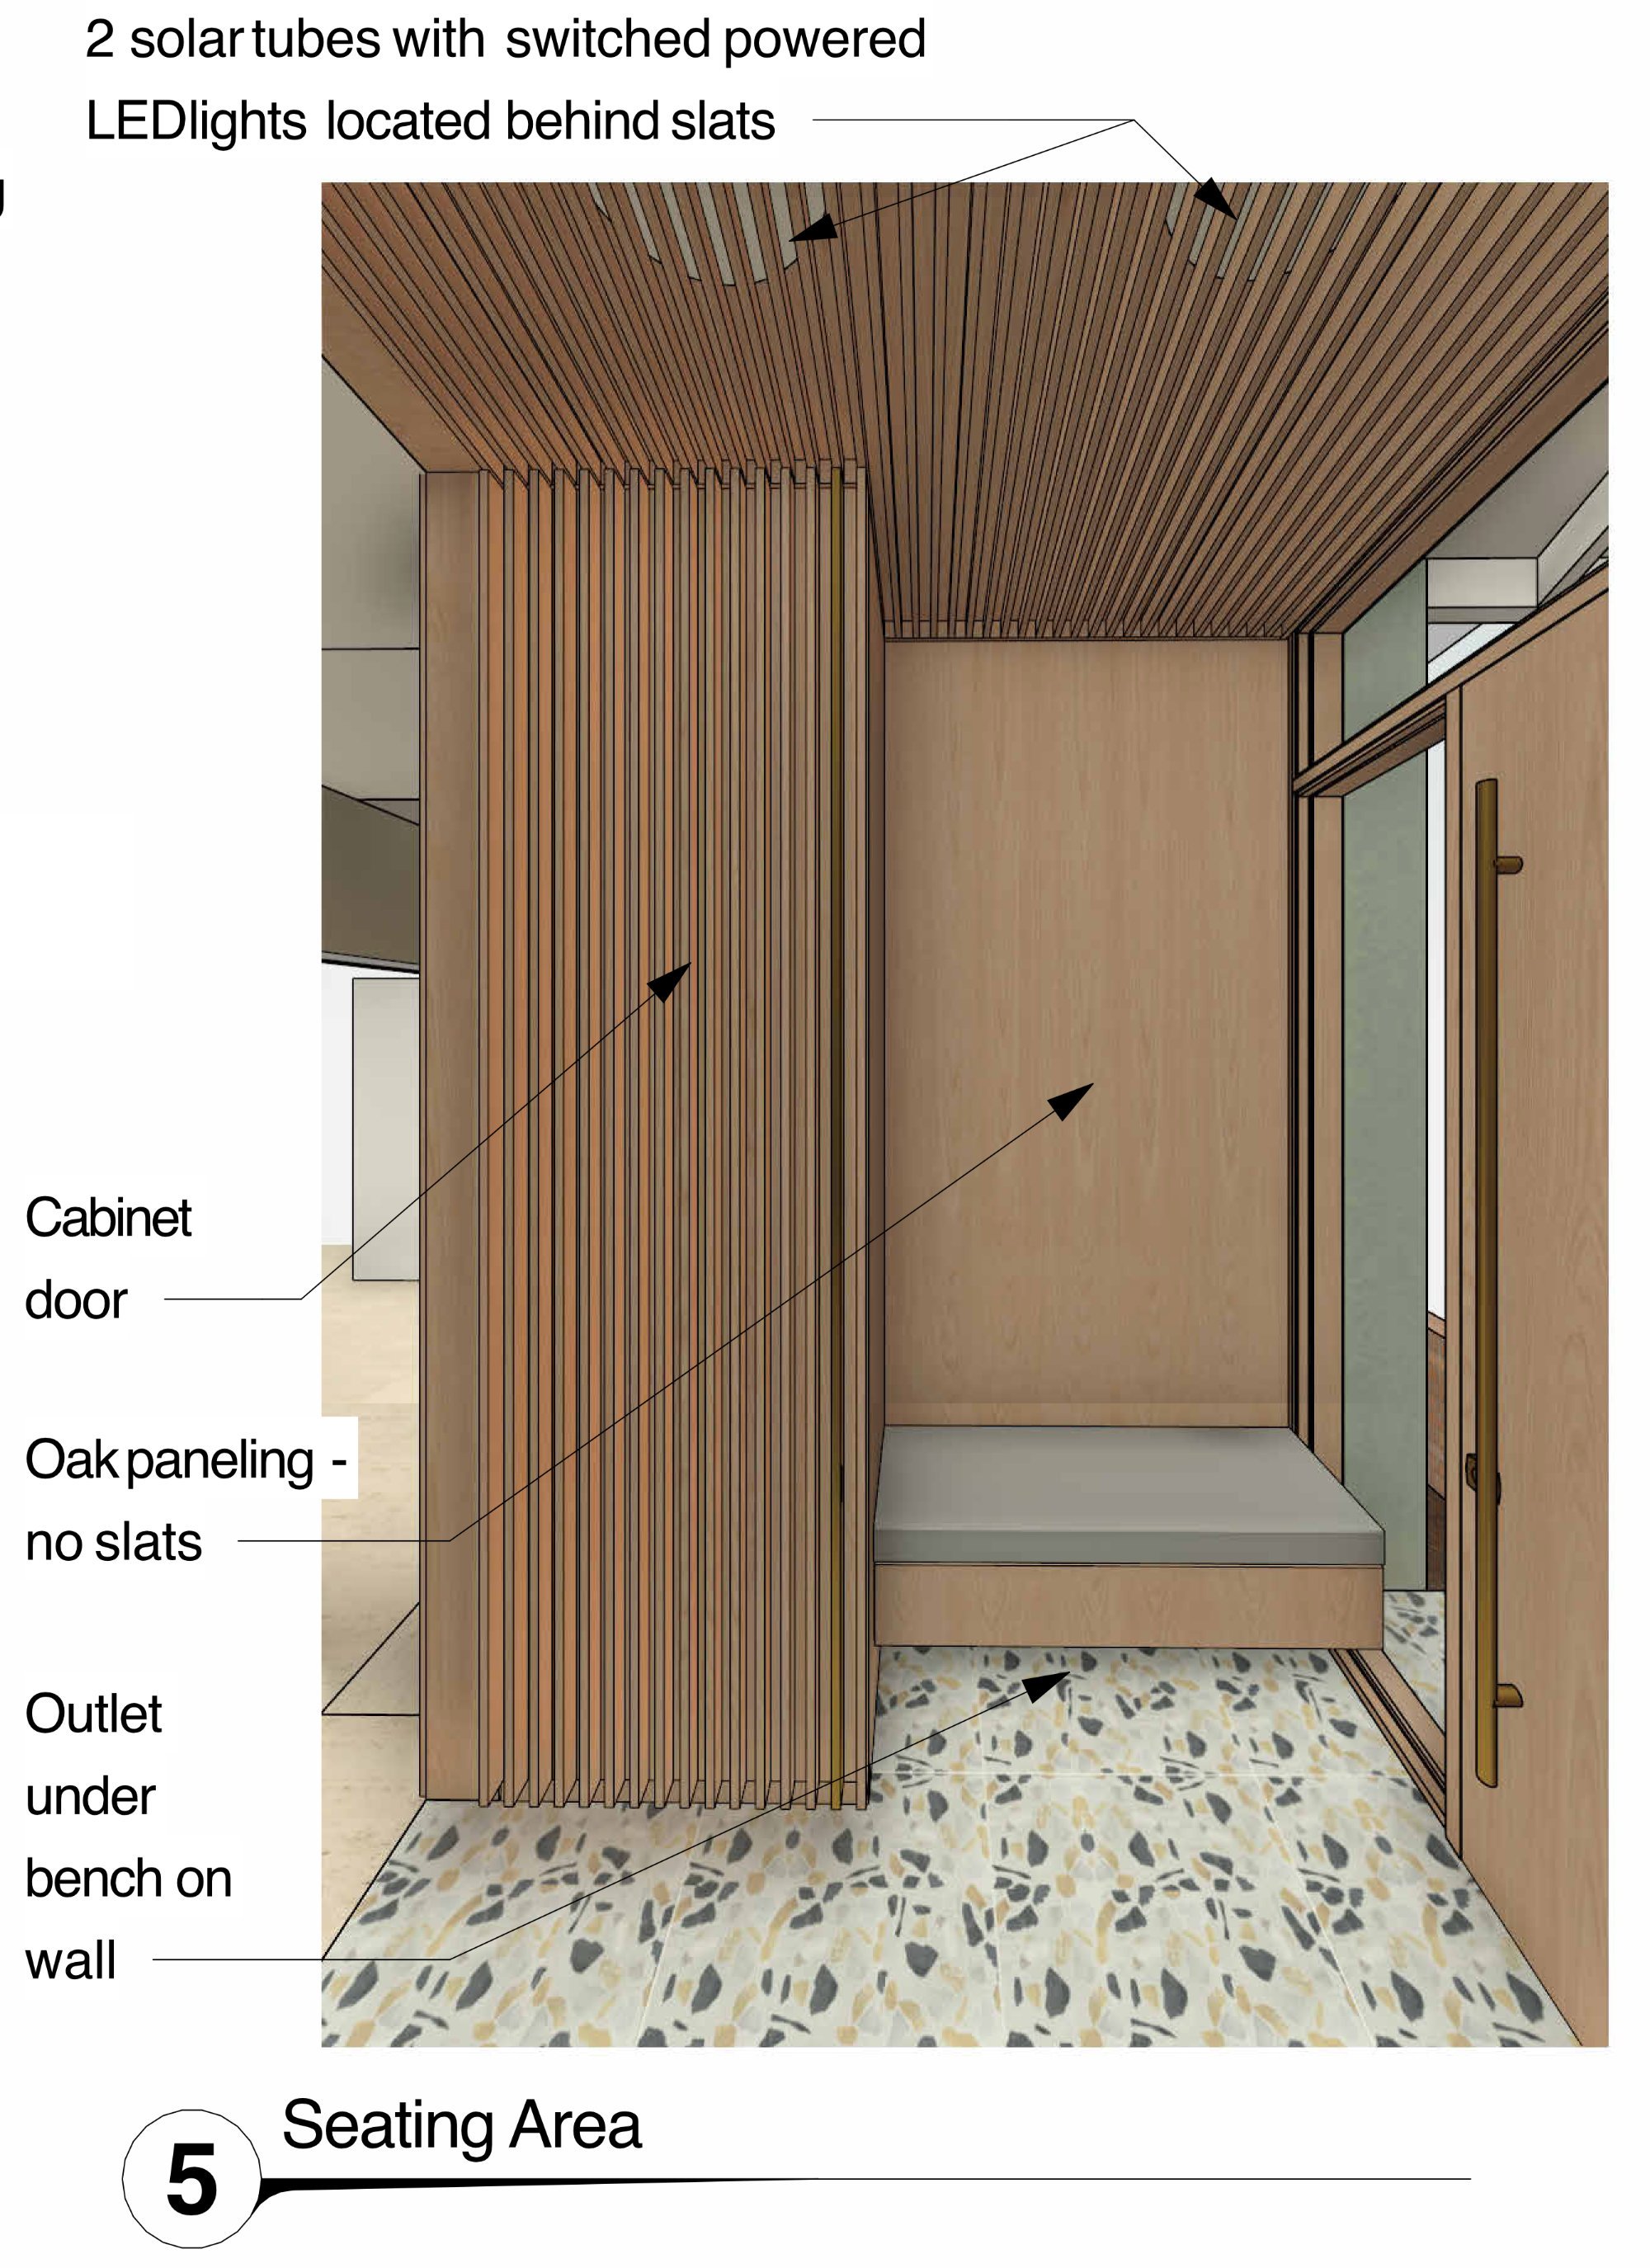
From a simple sketch to a stack of drawings a foot high, Plans are one of the main vehicles for defining, organizing, communicating, and documenting your project.

There are a few different standards people follow when creating plans, and thankfully most Cities will have some sort of guide or checklist of how they like plans prepared and what needs to be in them as a minimum. But generally a ‘set of plans’ will:

  • Start with title pages that usually have a list of the sheets in the set, the project location, basic project description, what standards the project will follow, and copies of various forms required for the permit.

  • Then have site plans pointing out where the work is to happen exactly, what the surrounding area / buildings are, what the overall plot of land is, and what changes are being done to it.

  • Then have various floor and ceiling plans showing what’s existing, what’s getting removed, and what’s getting built.

  • Then elevations showing the outside of the building & walls, again showing what’s existing, what’s getting removed, and what’s getting built.

  • Then sections (cutaway views), detailed drawings of specific bits of the building, enlarged plans of specific spots within the building, schedules and more towards the end that show all the nitty-gritty details of how the building is going to be built, and how it’s going to meet the various Codes it has to.

The plans usually just show how the building is going to be built, what’s going to be done, etc. Sometimes projects will also require ‘specifications’ which is a written document that outlines in more detail what specific materials, brands, and vendors can be used for the different elements within the building, and usually will also outline the approved ways those materials will be used or installed. Things like directing for the bathroom tile to be one of three brands, for the mortar used to install it be a specific type, for the tile to be stored onsite in a safe way, and for the boxes of tile to be opened and mixed together to ensure a consistent color is all the sort of things that go into a good ‘spec’ as it’s sometimes called.

Sometimes projects will also require things like structural calculations, environmental impact reports, site photos, and more things that aren’t ‘plans’ in the traditional ‘blueprint drawing’ sense, but will need to be included and kept together with the plans, and are considered part of the ‘set of plans’.

These sets of plans become legal documents, in that when you submit them to the City and get them approved, that is now the legal record for what you’re planning to build. If what you actually build doesn’t match, the building inspectors won’t approve it, even if what you did was fully to code. Hence why as the project changes, the plans need to be changed, and resubmitted for approval. Typically this will be called an ‘Addendum’ or a ‘Revision’, and sometimes if the change is big enough, it will even get a new building permit altogether. While sadly some architects don’t keep these plans up to date, it’s actually part of their professional responsibility and standards to do so, and to always have a reasonably up to date, fully coordinated set of plans for the project as it progresses. This is easy for Architects using BIM in a smart way (like we do) and much harder for those who aren’t, so it’s a good question to ask whomever you are hiring if they are working fully and correctly in BIM vs. 2D CAD or even still on paper.

Most plans are required to be prepared by a properly licensed architect and/or engineer. Commercial projects, anything involving redoing structure, etc. have to be prepared by a professional, who will ‘sign and stamp’ those drawings. When they do so, they are legally taking on the liability for what’s in those plans, and whatever issues may arise when it’s built. It may seem unfair or some sort of ‘professional capture’ forcing you to hire someone like me, but it’s honestly a kind of a deal around public safety. Architects and Engineers legally only get to do this sort of work (and call themselves by these titles) in return for being on the hook for whatever they propose in those plans.

For example, if your uncle tells you that you can totally pull out that pillar that’s in the way of your kitchen remodel, and you do so, and it causes part of your house to expensively fail, it’s pretty much on you. You can try to sue your uncle who gave you bad advice, but legally it’s entirely your responsibility and fault for doing structural work without an architect or engineer looking at it first.

If an architect or engineer makes a bad mistake like that, they are on the hook, and it’s legally their fault, not yours, and it’s a pretty straightforward case to make them fix the problems they caused (and your homeowner’s or business insurance company won’t be mad at you). That’s the deal, it’s exactly like a lawyer or doctor, only they get to do certain types of work and call themselves that, but in return they are liable and responsible for that work.

However, some smaller houses and residential remodels can be drawn up by anyone, hence why your kitchen designer can do all the drawings for your kitchen remodel. And as we said in the approvals section above, some really simple projects don’t even need drawings, just written descriptions, and can have over-the-counter permits. 

Variances

A ‘Variance’ is when you get official written approval to either not have to follow a specific rule in the code, or replace one rule with another. These also have to typically be applied for, and approved by the building officials, and honestly can be quite hard to get in many cases. You have to have a really good reason for it, and usually have to do something more strict in ‘trade’ to get one. 

For example, let’s say you have an existing building that was built a long time ago, and the planning rules have changed, and now your building has windows that are too close to the property lines to meet code. It may be possible to work out with the City that you’ll add in much more fireproofing around those windows, replace the windows with highly fire-rated ones, and add in a fire sprinkler system, and once you’ve documented how you’re going to do all of that, the City could grant you a variance that for this one specific project, and this one time, just this once, you’re going to be allowed to keep those windows because you’re doing above-and-beyond what’s normally needed.

So while variances are possible, they are unlikely and hard to get, so don’t be the future of your project on them until you have them in hand.

Applications get you approvals (and usually require plans), approvals get you permits, permits allow you to legally build things.

Next up in our final installment in this series we’ll dive into Inspections and Inspectors, how things tend to happen during the project, and project close-outs. I hope you’ve been finding this series helpful and as always I love to talk about these things, so please reach out to me if you have questions!

Jeffrey McGrew
A sneak peek at more mobile parklets!

The Parklets for the Interval that we design, built, and delivered have been such a hit that a new client asked for something similar, but even more portable, so they would work well for their mobile food / event business. These units have just started to make their quiet debut in San Francisco, and here’s a sneak peek!

These inviting mobile parklets easily come apart for easy shipping too.

Looking forward to seeing them this summer!

Jeffrey McGrew
Hacking the Building Code: Part Five - Occupant Loads and Construction Type

In the wake of the tragic Ghostship fire in Oakland, I got more involved with our local planning and building departments, as well as some local artist spaces and maker associations who were looking for advice. I also have taken many complex and unusual projects from concept to finished construction in many different cities. From this experience, I’ve realized that a guide to interacting with building officials and codes for people looking to do creative things with space was sorely needed. This series of blog posts hopes to be that guide. I’ll be posting these over the next few months with the intent to make a comprehensive guide.

The prior posts in the series are available here:

Hacking the Building Code: Part one - What are building codes and where do I find them?

Hacking the Building Code: Part Two - Building Officials and how to approach them.

Hacking the Building Code: Part Three - Use is the Key Factor

Hacking the Building Code: Part Four - Zoning & Occupancy

Disclaimer

This series is purely for informational and educational purposes and does not constitute professional or legal advice. While this information is provided by Because We Can, and while we endeavor to keep this information up to date and correct, we make no representations or warranties of any kind, express or implied, as to the accuracy or completeness of this information. We do not provide any guarantees or warrant and do not accept any liability on your actions from this information. Any reliance you place on such information is therefore strictly at your own risk, and we highly recommend you hire a building professional (like us) to review your specific case.

Occupant Loads & Construction Type

In our last posts, we covered Use and Occupancy. In this (rather long) post we’ll get into how specific Occupancies determine how many people can use a space or building, what a building has to be in order to support that use and number of occupants, and some of the other rules that can kick in depending on how many people are going to be within a space.

Occupant Load Factor

Every Use of a space drives something called the Occupant Load Factor. You take the area of the space, you divide it by this factor, and that gives you the number of occupants, or Occupant Count, you have to design the space to be able to accommodate. The Occupant Count is a theoretical assumption of how many people would be in a building or space in its normal everyday use. This number is very important, for that’s how many people you’ll need safe exits for, how big those exits and hallways / stairs to get to those exits need to be, what sort of hardware has to be on the exit doors, how many restrooms you’ll need to have, and more.

For example, if you’ve got an office space, the Occupant Load Factor is 100 in the office areas. So if your open office area is 6,000 square feet, that means the space has to be legal to have up to 60 people using it (6000 / 100 = 60). But let’s say your building also has a 1000 square foot storage area, and three big conference rooms that total 600 square feet as well. Storage space only has an Occupant Load Factor of 300, so it would at most have four people in it (rounded up), but an Assembly space such as your conference rooms might have an Occupant Load Factor of 15, which would give you 40 more Occupants there as well. If these additional forty-four people are going to be exiting through the same open office area, the hallways / stairs and exits from that area now have to work for 104 people instead of just 60, etc.

An exit, and the ‘path of travel’ you use to get to that exit, are required to be a certain size and have certain features depending on the number of people that will potentially need to use it when the building is fully occupied, and in some cases certain occupant counts or distances to an exit will require multiple exits regardless of their size. This is why theaters and sport areas have lots of large exits located all over the place that ideally go straight outside, and a small three-story office building still has to have multiple staircases within it. 

You can get the Occupant Load Factor from your local Building Codes or officials, there’s usually a table that calls them all out. The 2019 International Building Code has it as Table 1004.5, but your local rules might be different, so it’s always best to check in with a building official or professional.

Again, where this gets really critical is when you’re changing the Use of a space from what it was before, for by changing the Use, you chance the Occupancy, and by changing the Occupancy, you change the Occupant Load Factor, and by changing the Occupant Load Factor you change the theoretical number of people you have to have the building safely work for. Hence why changing an old warehouse into an event space can be tricky, for a warehouse only needs exits and bathrooms for a small handful of people, whereas an event space could easily have ten times or more people within it.

In some cases you are able to negotiate to either have less people in a space, and thus less strict rules that have to be followed. For example, if you have a space that would typically be a A-3 assembly occupancy, but you limit the number of people allowed in the space to under 50, there’s a special exemption that lets you classify that space as a less-strict B occupancy instead. Hence why you see in many small cafes and bars the sign ‘Max Occupancy 49 people’. By voluntarily limiting the number of people, you can negotiate with building officials and find exemptions that make it easier to use a space. So even if the Occupant Count from the Occupant Load Factor is over 50, by limiting to under 50 in this case, you don’t have to have a second exit, extra bathrooms, more fire-resistant construction, etc.

Or in some cases you can negotiate to have more people in a space that what is set by the Occupant Load Factors by going the extra mile. Adding extra exits, fire sprinklers when you don’t already need them, higher fire-rated construction, more signage, and other extra efforts when negotiated ahead of time with the building officials can sometimes get them to allow you to go over what the Occupant Load Factor says a space should be limited to.

One-time events can usually go over the allowed number if proper steps are taken as well. Party permits, approvals from the Fire Marshall, trained staff at key locations to help people to an exit in case of an emergency, additional signage, and more can all make it fully legal to have many people within a space for parties, events, and conventions that what’s normally allowed.

Finally most building permit applications require an ‘exiting plan’ that shows the Occupancy, Occupant Load Factor, and the calculated number of Occupants for every space within a building; as well as the path of travel from those spaces to the exits, what the ‘Fire Rating’ is of those parts of the building, how wide those exits are, and how many people would be using each exit. This sort of plan summarizes everything that the Building Department cares about when it comes to Occupancy and Exiting, and can be very useful to already have when trying to figure out how to affordably change the Use of various spaces within a Building. It’s something you can hire us or any other competent commercial Architect to put together as part of a project assessment, so that you can really understand just how much work your project might be!

Construction Types & Fire Ratings

The Occupancy, and thus the Use, of a building or space also drives what it’s made out of for fire safety. For example, with the tragic Ghostship fire that inspired me to produce this series, it’s my understanding that a major factor in the travesty was that there was only one main exit stair from the upstairs event space, and that stairway was made from salvaged, unfinished wood (some from pallets even!) and was open to the downstairs space. So once a fire started downstairs, the only exit stair caught on fire too, and there was no safe way for people upstairs to exit. Had it been a legal event space, there would have been more than one exit stair, and those exit stairs would have been required to be much more fire-resistant and made from ‘non-combustible’ materials.

The way the Building Code handles this issue is that Buildings are classified into ‘Construction Types’ based upon how fire-resistant they are, which is dependent upon what they are generally made out of. There are five main types, denoted for some reason with roman numerals, going from the most fire resistant “Type I” to the least resistant “Type V”. How big of a building or space of a certain Occupancy is allowed is determined by these Types. And in some cases, certain Occupancies aren’t even allowed if the building isn’t a minimum Type. It’s easy to classify most buildings, as you’ll see below with each Types definition.

Additionally, specific parts of the building are ‘Fire Rated’. This is a measure of how long it would take for a fire on one side of something to reach the other side. So, for example, a One Hour Rated wall is made of materials such that a fire of a certain size on one side of the wall would take an hour to reach the other side of the wall. This ‘Fire Rating’ is used for all sorts of construction; walls, floors, ceilings, doors, windows, stairs, and even whole assemblies of these parts. So a ‘Two Hour Rated exit corridor’ is an entire hallway to the exit where all its walls, the floor, and the ceiling would hold back a fire for two hours to allow people to safely exit the burning building in that time span. 

There are five levels of Fire Rating, from the most fire-resistant ‘Four Hour’ rating, to a slightly less fire-resistant ‘Three Hour’, ‘Two Hour’, ‘One Hour’, and finally the ‘Unrated’ for everything else. In order for part of your building to be Fire Rated, it has to match lab-tested and proven pre-defined constructions, and have to follow specific building codes exactly (down to nail placements!) in order to work. Chapter Seven in the International Building Code is all about this, and there are construction guides, such as the UL one here, and the USG one here, that show some of the pre-approved ‘assemblies’ that work. 

The tests are actually really cool! They build the structure as it is defined, and then do a controlled burn on one side of it under strict conditions and measure the results. There’s some neat videos of the process, like this one:

But this is why it can be challenging even for building professionals to determine what Fire Rating parts of an older existing building’s construction are, or what needs to be done to get them to be properly Fire Rated. As there are lots of different pre-approved ways to accomplish it, but they are all complex and demanding, and to prove that something was built correctly to a specific specification you might have to take some of it apart for proper inspections. This is where a building professional with lots of experience in accessing older buildings for creative new uses (such as BWC!) can go a long way to affordably figuring out what’s really possible.

This is also why building with non-traditional materials, such as with hay bales, can be so challenging, for until there is a proper UL tested and approved assembly to reference, the Building Department won’t approve it without some major work on your part to either prove that it works, or do something they feel makes it work (like add in additional fire sprinklers that weren’t required before).

Finally most materials fall into a ‘Combustible’ vs. ‘Non-combustible’ classification, where ‘Non-combustible’ = a material that can’t burn at all under normal circumstances (i.e. concrete, steel, glass) and ‘combustible’ (everything else). Sometimes a combustible material isn’t allowed within a certain construction type, fire rating, assembly, or even exit pathway; which is why exit hallways can be a drab combo of raw concrete and painted drywall. 

Here’s a quick summary of each Construction Type:

Type I

Type I buildings are the most fire resistant. Nothing flammable can be used for its exterior walls, structure, interior walls / floors / ceilings / etc. In some classifications flammable finishes can be used, but in the most restrictive classification even that isn’t allowed. Examples are skyscrapers, hazardous modern factories, and concrete bunkers. There are two subclasses of Type I buildings, based upon the Fire Ratings of their parts, with a Type IA being more fire-resistant than a Type IB. 

Type II

Type II buildings are mostly educational buildings, newer commercial buildings, shopping malls, and smaller theaters. Again, the exterior walls, floor, and frame are non-combustible; but don’t have to be as highly fire-rated as a Type I building, and some combustible interior elements are allowed. There are two subclasses, with Type IIA following more strict testing standards than Type IIB. 

Type III

Type III buildings are probably the most common type for an older existing commercial or a newer residential condo / apartment building in a city, where the exterior of the building is made of inflammable rated materials, but the ‘guts’ of the building are not. Think of your typical older warehouse, small office building, or larger condo building; concrete or brick exterior walls with wood structure and floors inside. It, too, has two subclasses, with a Type III-A having more fire-resistant ‘guts’ in it’s interior structure and floors / roof, and a Type III-B that only requires the exterior walls to be fire-rated.

Type IV

Type IV buildings are mostly historic, pre-1960, for they have a main structure made of heavy wood timbers 8” or larger. It’s extremely unlikely for a modern building to fall into this classification, but some older factories, churches, and warehouses do. They are very similar to a Type III-B building, in that only the exterior walls need to be fire rated, but they are generally more fire resistant than the following Type V building. 

Type V

Type V buildings are the least fire-resistant, and are mostly made of wood. Houses, smaller apartment buildings, and some smaller commercial buildings fall into this category. Here, too, there are two subclasses, with a Type V-A requiring the exterior walls, interior structure, and floors / roofs to be at least 1 Hour Fire Rated (the lowest, easiest rating to produce) and a Type V-B that doesn’t have many limits on what you can use to built it with.

Construction Limits

As was stated at the beginning of this section, there are limits on how big of a building or space of a particular occupancy can be. The Construction Type will set what how tall a building of a particular Occupancy can be, how many stories it can have, how much square footage, and more. Chapter 5 of the International Building Code goes into lots of detail on this, with lots of tables where you can look up what type and size of Occupancy is allowed within a certain Construction Type.

So it’s best to do an initial assessment of any existing building to determine its Construction Type to better understand if the Use, and the number of people, you’re planning on is allowed in that specific kind of building (or part of it). It could be that a space that works just fine for a small Café won’t work if that Café is expanded into a large restaurant that takes over the rest of the all-wood building.

Additional Fire Rated Constructions

So while the Construction Types set the overall requirements for what has to be fire rated parts of the building, there are other rules that also trigger additional rated elements. These are too numerous to list, but we’ll cover the big ones you’re likely to encounter.

Separations between certain Occupancies are required. For example, no rated separations are required between an Business occupancy and a F-1 light manufacturing one. But an Assembly occupancy of a certain size has to be separated from a Business occupancy with two-hour rated construction. In some cases, certain occupancies aren’t even allowed to be connected at all, and have to be completely separate. Like a Residential use being combined with a Hazardous use. Table 508.4 in the International Building Code shows all of the variations and what has to be separated from what and how. Note that in many cases, having fire sprinklers makes the Rating requirements much lower (that’s what the ‘S’ vs ‘NS’ at the top of the chart is for).

Also it’s typical that the hallways going to an exit, exit corridors / stairs, and exits themselves have to be Fire Rated, even when the surrounding parts of the building might not need to be. For example, in a Type III-A larger building, the stairways and hallways to them will all be 1 Hour Rated or more, even when the rest of the interior construction isn’t.

Finally, specific Uses and even equipment may require additional Fire Rated construction around them, such as a commercial kitchen or an industrial oven within a larger non-rated space.

Use sets the Occupancy, Occupancy sets what kind of building is allowed, what Fire Ratings the parts of it have to have, and how many people can use it.

In our next section, we’ll get into Applications, Plans, Permits, Variances, and Reviews!

Our Zund router attachment does amazing engraving work

Now that we have the Zund’s router attachment really dialed in the quality of our engravings has been just wonderful. Since it spins up to 50k RPM (!!) you can get amazingly clean lines with it in harder materials, like this polycarbonate.

It’s very satisfying to peel the protective layers after the fact too…

Jeffrey McGrew